To make a terraced loft feel seamless, align structure, light, and finishes for a single continuous run. Start with feasibility: confirm ceiling heights, permits, and external constraints. Plan large glazing and skylights to flood the space, use reflective floors, and maintain material continuity from floor to ceiling. Blend hidden soffits and soft-closure panels, preserve visible beams, and guarantee phased work to limit disruption. Master circulation, multi-use zones, and built-in storage. If you push further, you’ll uncover how to optimize every detail.
Key Takeaways
- Align structural and finish details to create uninterrupted sightlines and seamless ceiling shifts throughout the loft.
- Use large glazing, reflective surfaces, and consistent materials to maintain brightness and material continuity.
- Preserve character by exposing beams and balancing old patina with modern upgrades for a cohesive look.
- Plan flexible spaces with integrated storage and multi-use furniture to reduce visual clutter and expand perceived space.
- Coordinate exterior and interior detailing with planning constraints to ensure a seamless transition from old façade to new loft interior.
Feasibility and Goals for a Terraced Loft Conversion

Evaluating feasibility and setting clear goals are the foundation of a successful terraced loft conversion. You’ll assess structural viability, regulator expectations, and budget constraints early, so you avoid costly surprises later.
Begin by inspecting the exterior facade for load-bearing elements, roof slope, and potential extensions. Then confirm existing ceilings and floor heights meet practical conversion standards.
Your goals should specify usable space, natural light strategy, and how the loft integrates with the ground floor flow.
Map out permitted dimensions, zoning limits, and potential daylighting options, aligning them with practical timelines.
Check building permits requirements now, identifying required surveys, fire safety upgrades, and party-wall considerations.
By defining scope, constraints, and milestones, you create a realistic path to a compliant, efficient, and aesthetically cohesive conversion.
Exterior facade considerations and permit readiness shape your plan.
Design Principles for a Seamless Floor-to-Ceiling Transition
You’ll plan seamless ceiling shifts by aligning structural and finish details for uninterrupted sightlines.
Prioritize light-flooded vertical space with large glazing and reflective surfaces that extend the ceiling visually.
Maintain material continuity from floor to ceiling to reinforce a cohesive, uncluttered flow.
Seamless Ceiling Transitions
Are seamless ceiling shifts the telltale sign of a polished loft conversion? You aim for a continuous plane that ties rooms together, not interrupted joints. Achieve this with precise ceiling height planning, ensuring progressions align with adjacent walls and cabinetry.
Use hidden soffits or micro-bevels to mask variations, preserving a single sweep from top to bottom. Choose materials with consistent thickness and finish, avoiding glare breaks at seams.
Acoustic insulation plays a pivotal role: install dense, gap-free layers above living zones to prevent sound transfer and keep perceived height intact.
Where ducts exist, integrate them into ceiling cavities with soft-closure panels that don’t interrupt the line. Finish with a seamless paint edge and minimal trim to sustain the uninterrupted ceiling feel.
Light-Flooded Vertical Space
Bright, daylight-filled vertical spaces define a seamless loft aesthetic, so design with light as the main driver. You optimize glazing to illuminate vertical planes without glare, using tall, narrow windows or skylights that align with sightlines from primary living zones.
Correlate ceiling height with window scale to create a continuous feel; avoid heavy mullions that interrupt flow. Position openings to prioritize Outdoor integration, blurring inside and outside boundaries while maintaining solar control.
Use light-reflective finishes and minimal, integrated storage to preserve airiness and vertical clarity. Guarantee acoustic insulation around glazing and floor/ceiling junctions to prevent sound transfer, especially near common areas.
Favor frameless or slim-framed treatments to preserve uninterrupted sightlines and emphasize vertical Volume. Maintain consistent elevations to reinforce a seamless transition from floor to ceiling.
Material Continuity Flow
Material continuity flows from room to room through a deliberately shared palette and uninterrupted material language. You guarantee that joints, finishes, and textures align from floor to ceiling, reinforcing a single spatial story.
1) Choose materials with uniform grain and sheen to avoid visual disruptions.
2) Align edge details at openings, trim, and transitions for a seamless flow.
3) Plan for consistent scale and rhythm in panels, boards, and plaster.
4) Integrate historical preservation and exterior modifications choices early to maintain cohesion.
This approach keeps the loft’s ceiling-to-floor line uninterrupted, even with structural or service updates. You balance modernization with restraint, prioritizing a calm, unified interior language.
Focus on authentic material behavior, precise detailing, and restrained coloration to ensure the space reads as one continuous continuum rather than disjointed zones.
Lighting Strategies: Glazing, Skylights, and Reflective Surfaces
Glazing, skylights, and reflective surfaces aren’t just design elements; they’re strategic tools to maximize daylight, regulate heat, and enhance perceived space in a terraced house loft.
You optimize this by pairing expansive glazing with operable skylights for controlled ventilation, while low-e or reflective coatings minimize heat gain.
Position windows to frame focal views and channel natural light across work zones without glare.
Use reflective surfaces—light-colored floors, glass backsplashes, and polished metals—to bounce daylight deeper, reducing reliance on artificial lighting.
Choose window treatments that preserve flexibility: motorized blinds for varying sun angles, sheer fabrics for diffusion, and blackout options for privacy.
Coordinate color schemes to reinforce brightness and cohesion, ensuring the loft reads as open, airy, and calm.
Preserving Character: Beams, Materials, and Sympathetic Finishes
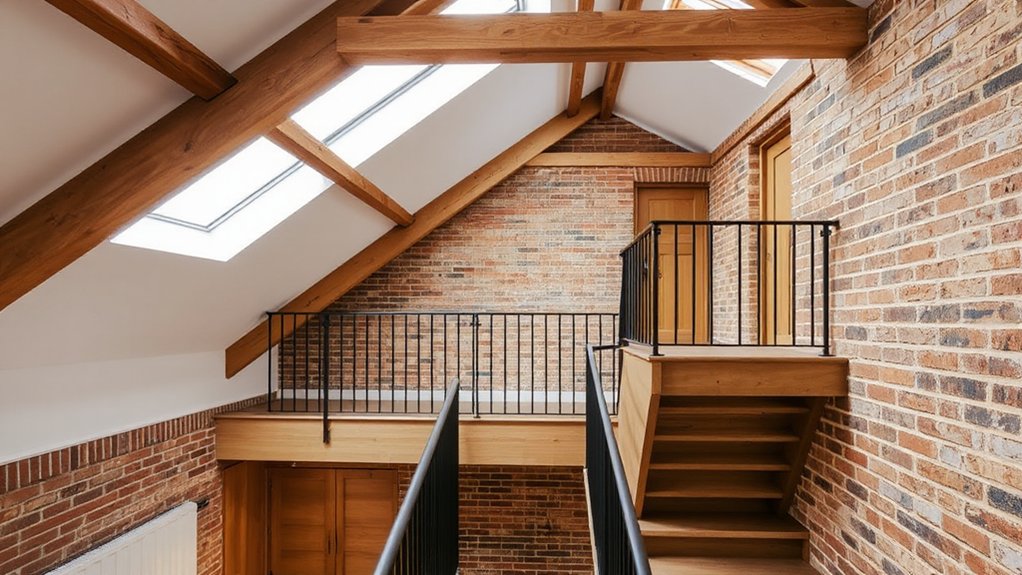
Preserving character in a terraced loft means honoring the building’s bones while you upgrade habitats. You’ll balance restoration with modern needs, keeping integrity intact while ensuring performance.
- Beams stay visible where possible, treated to tame age and reveal their history without overpowering the space.
- Materials harmonize; select veneers and textures that echo original palettes, then pair with restrained finishes for cohesion.
- Sympathetic finishes sit between old and new, avoiding heavy coatings that mask patina or create cold contrasts.
- Facade renovation and external insulation are considered early, preserving façade rhythm while boosting energy use and weather resilience.
You’ll plan detailing that respects proportions, alignments, and joints, so the loft reads unified rather than juxtaposed.
Space Planning for Flow: Circulation, Zoning, and Multi-Use Rooms
Effective space planning in a terraced loft hinges on clear circulation, purposeful zoning, and adaptable multi-use rooms. You map primary paths first, then carve zones that support daily routines without crowding sightlines.
Circulation should be intuitive: keep main routes-wide, align stairs with natural traffic, and avoid dead ends that trap movement.
Zoning uses lighting, color, and ceiling planes to distinguish living, working, and sleeping areas without walls that close the space.
Plan multi-use rooms with flexible furniture and movable screens that reframe function in minutes.
Consider outdoor integration where possible, linking interiors to a narrow balcony or courtyard to extend living space and illuminate flow.
Address acoustic insulation to prevent sound transfer between zones, preserving calm in active areas and privacy where needed.
Smart Storage and Furniture Planning for a Clutter-Free Loft
Smart storage and furniture planning keep a terraced loft from feeling cramped by prioritizing built-in solutions, smart layouts, and flexible pieces. You’ll maximize vertical space, conceal clutter, and maintain clear sightlines for a calm, open feel.
1) Choose built-ins that fit eave lines and alcoves, avoiding freestanding bulk.
2) Design multi-use zones with foldaway desks, murphy beds, and modular seating.
3) Use integrated storage under stairs and behind sofa backs to hide everyday items.
4) Plan traffic flow around storage trunks, with accessible, labeled cabinetry for quick tidying.
Smart storage and furniture planning hinge on choosing compact, tailored pieces, not oversized furniture.
Precision in measurements, material continuity, and clean edges keep the loft cohesive while remaining highly functional.
Budgeting and Phased Work for Terraced Homes

You’ll start with phased budget planning that aligns with each stage of a terraced home project, so cost estimates remain realistic as scopes shift.
We’ll scope terraced constraints upfront—think party walls, access limits, and structural checks—so you aren’t surprised by fixes later.
Set timeline milestones now to track approvals, trades, and weather windows, keeping the build steady and predictable.
Phased Budget Planning
- Establish a hard cap and phase-by-phase cost map
- Build contingencies into every line item
- Align vintage fixtures and exterior aesthetics early
- Schedule staged commitments to trades and materials
Scoping Terraced Constraints
Terraced homes demand careful scoping where every constraint informs budget and phased work. You map structural limits, access routes, party-wall responsibilities, and neighbor-facing disruption to quantify costs and sequence tasks.
Budgeting hinges on reinforcing foundations, managing timber decay, and accommodating lintels without overreaching spend. You group work into deliverable phases that align with access windows, scaffold logistics, and council approvals, preventing rework and delay.
When you consider urban aesthetics, you plan finishes, lighting, and fit-out scales that respect sightlines and external rhythm.
Historical preservation informs material choices, using compatible plaster, timber, and brick repair strategies to minimize reversals. You also secure contingency buffers for unforeseen constraints, ensuring your phased plan remains adaptable.
The outcome is a cost-conscious, respectful, and seamless progression.
Timeline Milestones Management
Careful timeline milestones drive cost control and orderly phased work in terraced homes. You’ll map budgets to each stage, align approvals, and minimize disruption to neighbors.
Start with a detailed scope for Historical preservation and exterior modifications, then bind costs to a realistic cadence, not a guess. Monitor progress weekly, adjust contingencies, and keep stakeholders informed.
A disciplined schedule reduces overtime, delays, and material waste, while safeguarding the cadence of shared walls.
- Define phased milestones with fixed budgets and approval windows
- Align exterior modifications with planning constraints and historical requirements
- Lock in contractor sequences to minimize attic, floor, and wall disruption
- Implement continuous tracking, variance reporting, and proactive risk management
Minimizing Disruption During Conversion: Practical Steps and Tips
To minimize disruption during a terraced house loft conversion, plan around key milestones and communicate them clearly with everyone affected. You’ll set a concise schedule that aligns construction phases with the daily routines of neighbours and your household, minimizing surprises and noise windows.
Use protective measures: dust barriers, temporary floor coverings, and sealants to contain debris. Coordinate deliveries to avoid street clutter, and establish clear access routes so trades don’t block essential paths.
Document decisions in a project brief, including historic preservation considerations and environmental impact controls, so compliance isn’t overlooked. Assign a single point of contact for updates, questions, and conflict resolution.
Regular briefs reduce miscommunication, while post-work cleanups preserve property value. Finish with a documented handover checklist to ensure all finishes meet your standards.
Troubleshooting Common Terraced-Loft Challenges
When you’re tackling terraced-loft projects, you’ll encounter challenges that demand practical, proactive solutions.
Troubleshooting commonly means anticipating issues before they become costly delays. You’ll balance space optimization with structural safety, while honoring historical preservation and neighborhood regulations.
Stay methodical: verify roof integrity, ensure airtight envelope, and address moisture promptly to prevent mold. Keep insulation robust without compromising ceiling height, and verify electrical and plumbing meet code.
Communicate early with authorities to avoid permits stumbling blocks, and document changes for future revisions.
- Verify structural integrity and load paths early
- Audit moisture, insulation, and ventilation for energy efficiency
- Align design with historical preservation guidelines and neighborhood regulations
- Maintain meticulous permit, variance, and documentation records
Frequently Asked Questions
How Long Does a Terraced Loft Conversion Typically Take?
A typical terraced loft conversion takes about 6–12 weeks, depending on finishes and approvals. You’ll guarantee loft insulation is up to standard and meet ventilation requirements, plus coordinating trades to avoid delays and maintain steady progress.
Can a Conversion Impact Party Wall Agreements or Neighbors?
Like a ticking clock, yes—your conversion can affect party wall agreements and neighbor disputes. You’ll need notice, potential party wall awards, and clear communication to protect both sides; prepare for mediation if disagreements arise, and document every step.
What Is Minimal Ceiling Height for Usable Loft Space?
The minimal usable loft ceiling height is typically around 2.0 to 2.1 meters, depending on local rules. You should guarantee adequate Ceiling insulation and Ventilation requirements are met for comfort, safety, and compliance.
Are Building Regulations Different for Terraced Houses?
Yes, they differ by jurisdiction, and you’ll navigate permits accordingly. You check Building permits, you guarantee Structural integrity, you confirm compliance, you document calculations, you coordinate inspections, you plan approvals, you protect occupants, you avoid penalties, you proceed confidently.
How Do I Avoid Roofline and Stairs Conflicts?
Roofline conflicts must be avoided with precise planning; prioritize efficient Staircase placement to maximize headroom and flow. Evaluate options early, use compact, compliant stair configurations, and coordinate with joists and rafters to prevent future fit issues.
Conclusion
In a terraced loft, you seek a quiet skyline inside. Juxtapose the old with the new: timber beams against glassy dawn light, defined zones amid open flux, clutter vanishing behind smart storage. You plan meticulously, yet breathe easily, balancing budget with ambition. The result reads seamless—like a single room that insists on rhythm: circulation that glides, surfaces that reflect, and a home that feels both expansive and intimate, a terrace you’ve finally carried downstairs.